Final Cut Pro 10.6
and Compressor 4.6
Object Tracker
There are two important new features in 10.6; the first is Object Tracker. It makes it possible for titles, generators, images, or effects to track objects in the video.
To add a title to be tracked, drag the title from the Titles browser into the Viewer and place it on object to be tracked. The application will target the object and place a grid over it.
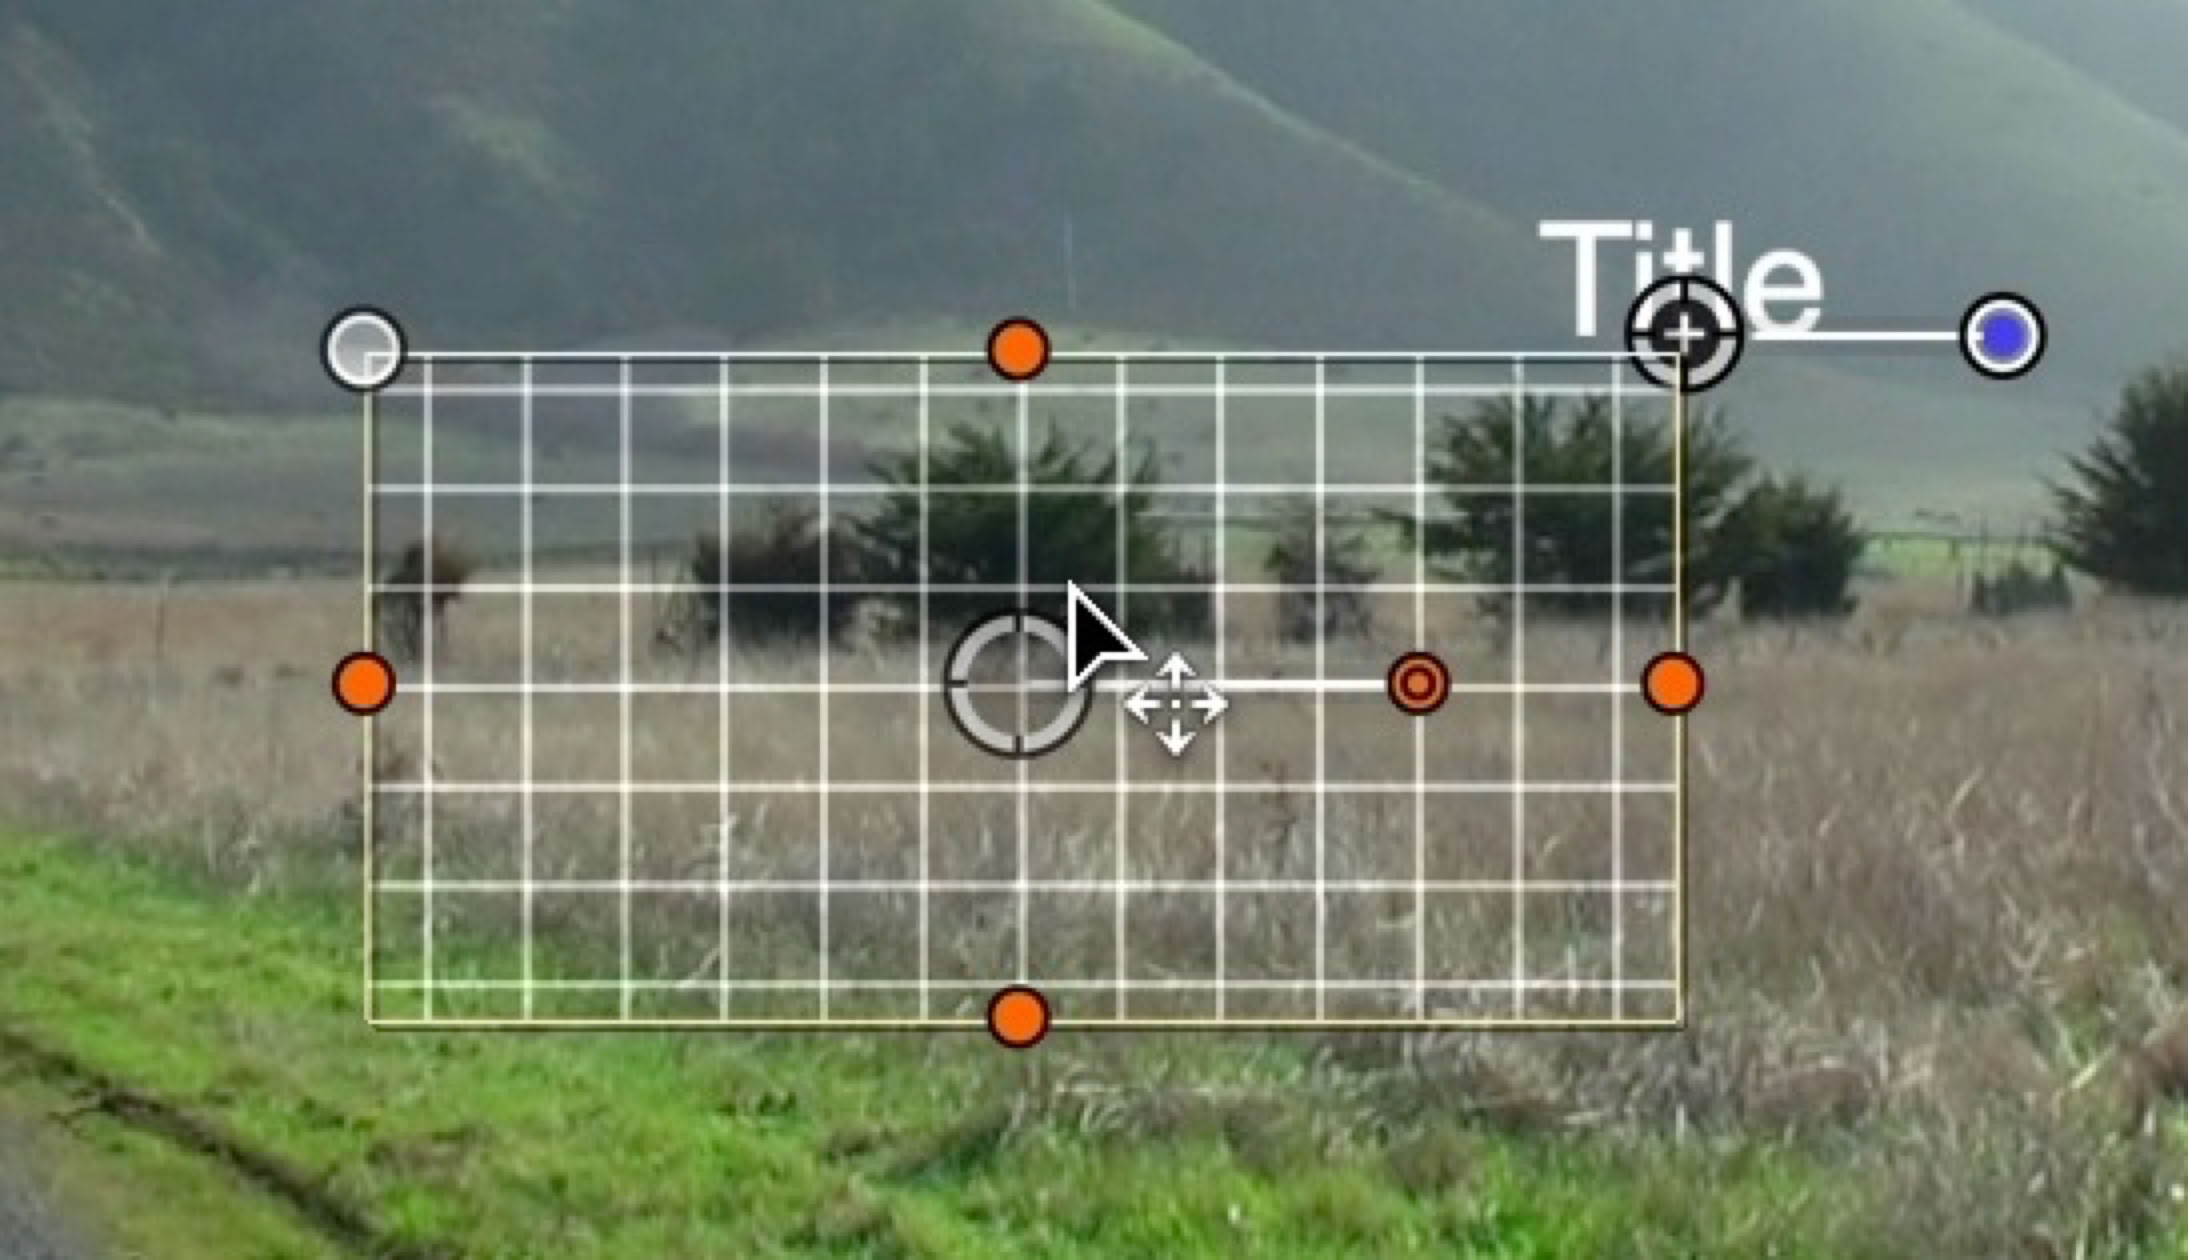
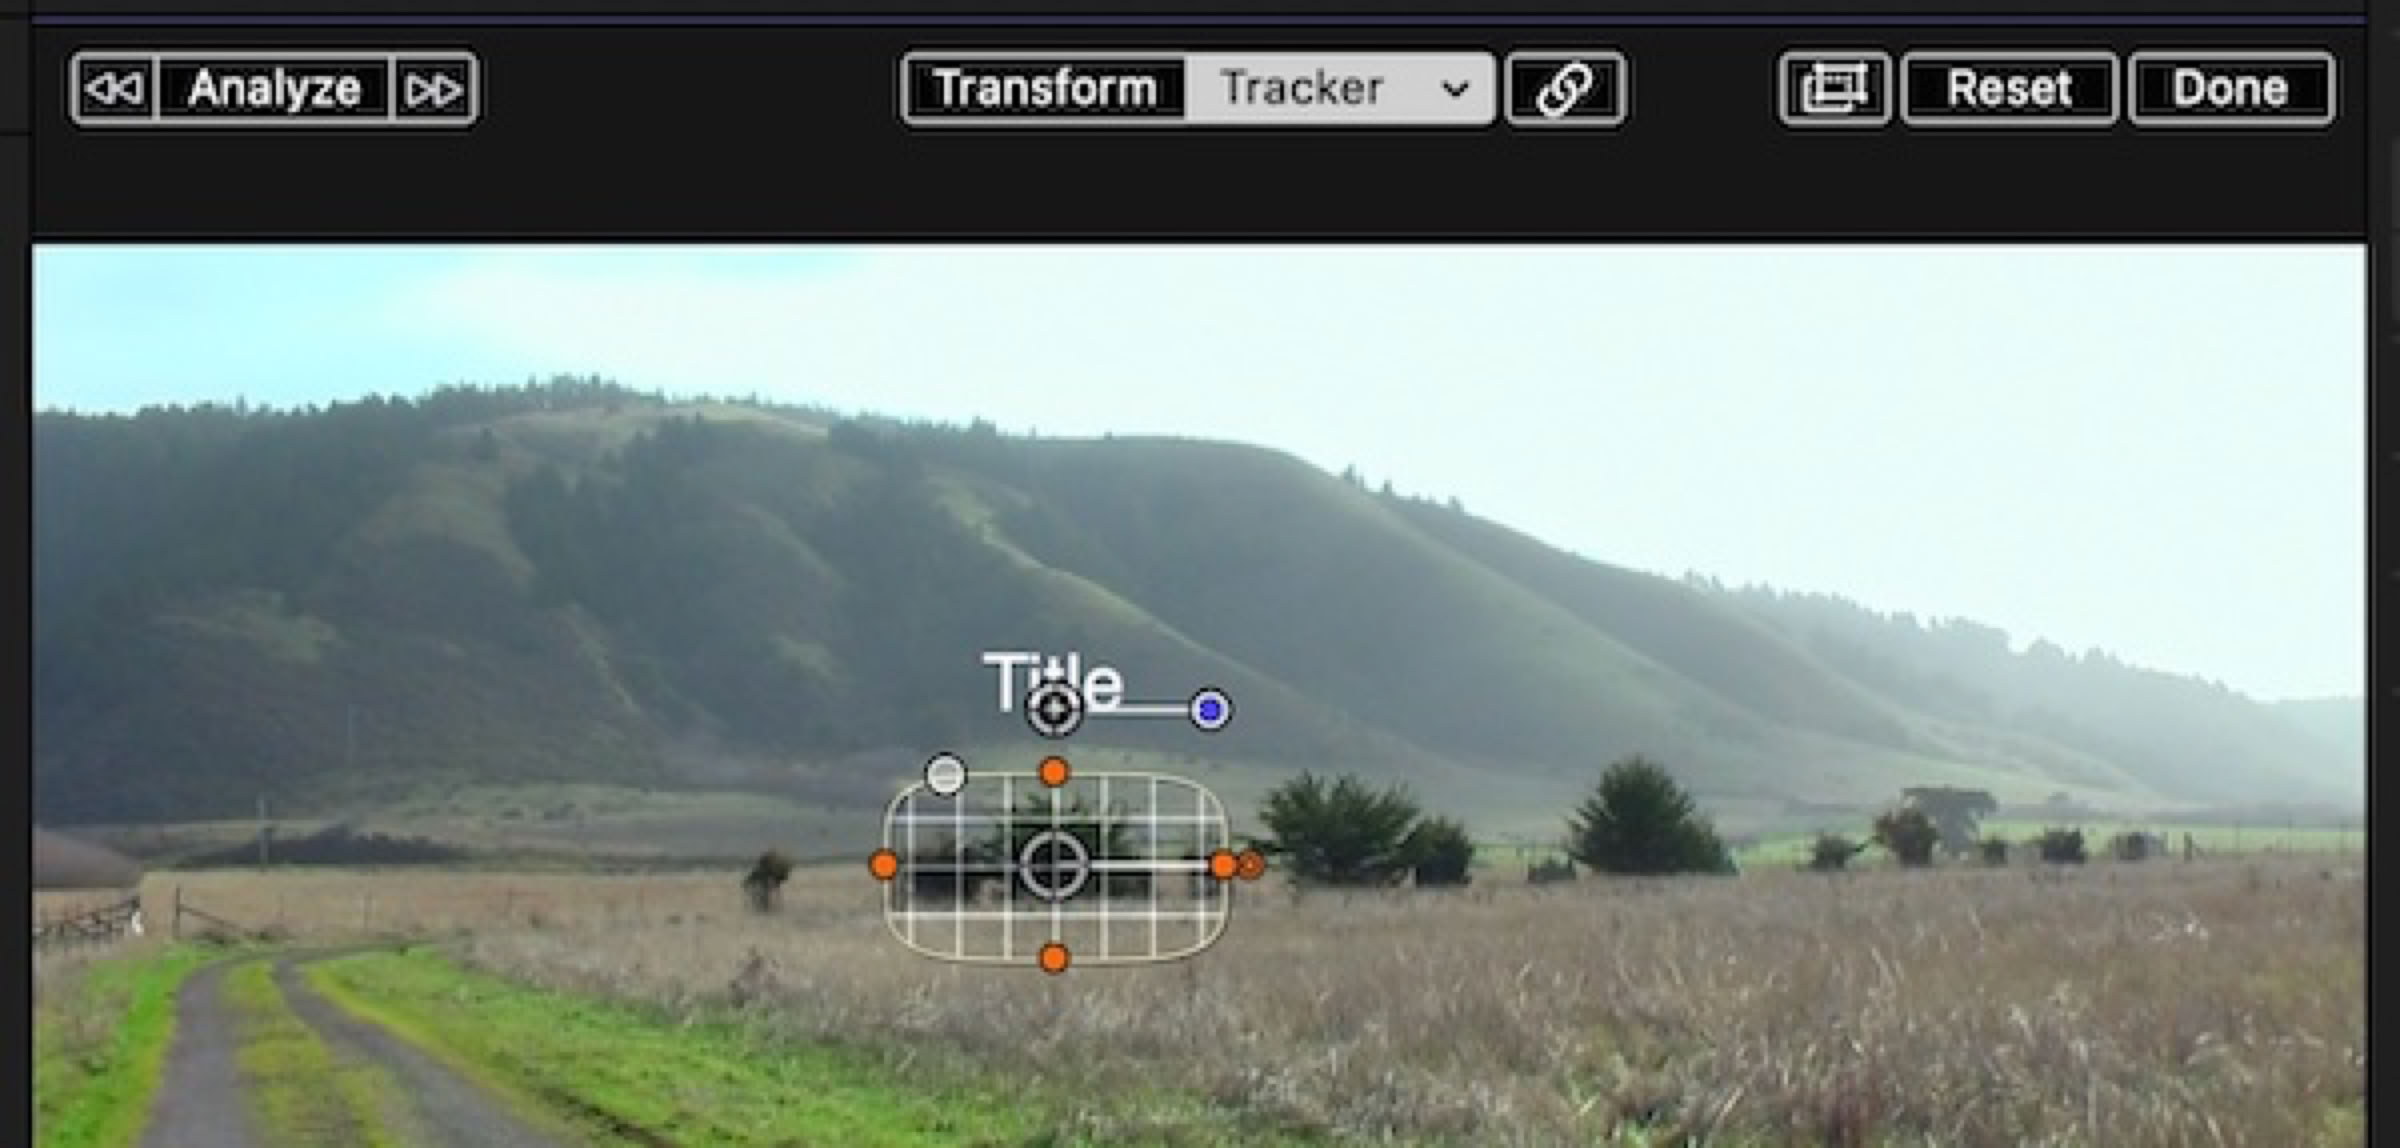
The grid’s shape and size can be adjusted for the object to be tracked. At the top of the Viewer are controls for Analyze, Reset, and Done, as well as a button to link and unlink the title. Once the grid is shaped, position the title in relation to grid. Then, with the title selected in the Timeline, run the analysis for the application to track the object in the video as it moves in the frame. Though the title is selected, the tracker as added to the video.
You can also add an effect to clip in the same way. When the effect is into the Viewer and positioned over the object to be tracked the grid will be added. The area to be tracked is applied to the effect’s Shape Mask.
Sometimes it’s easier to apply the tracker first, especially if the application AI is having difficulty finding a target point. Once the tracker has been added you can attach items to track to it. In the clip’s Video inspector there is a new Tracker item. Click the + button to add the tracker.
You can Option drag the grid that appears in the Viewer, and the application will try to find objects to track. You can also simply place the grid on an object and run the analysis. If the track is a little off you can reanalyze a section. Open the Tracking Editor by right-clicking on the clip and selecting Show Tracking Editor or using the shortcut Option-Command-T. Drag a selection on the tracking bar and click the Analyze button.
In the inspector you’ll see different analysis types. Try out which one work best for your material.
To attach an object, a title, a generator, an image to the track, place it in the Timeline, and in the Viewer position it where you want in relation to the grid. With the connected item selected in the Timeline an overlay appears in the Viewer for Transform and Tracker, with a drop menu attached. Select Tracker and in the drop down menu select Object Tracker to attach the item to the tracker. It’s as simple as that.
One note, the effects in the Mask category, like Draw Mask and others, cannot be linked to the Object Tracker. Perhaps that will be incorporated in a future version.
Cinematic Mode Controls
FCP 10.6 also brings the ability to use iPhone 13’s Cinematic Mode controls into the editing platform. While FCP 10.6 can run on the last versions of Big Sur, Cinematic controls require macOS Monterey 12.0 or later. To import the Cinematic clips you can either drag them into your library from the Photos browser, making sure that they are stored locally and not in the iCloud Photos Library. You can of course import by connecting your phone and using the FCP Import window, which is my preferred method. You can also drag and drop directly from the Photos application to your hard drive. (You cannot drag and drop video from the Photos application to FCP.) From someone else’s phone, if you cannot connect it by cable to your computer, you can use AirDrop. Select the clips on the phone and use Share. It’s important that you tap Options at the top and make sure All Photos Data is enabled, or the Cinematic metadata will be lost. You have to do this for each Share as the data options is not sticky. For Cinematic media a folder appears with three files, two video files and a .AAE file that contains editing information about the clip. The file with an E in the name has the AI focus decisions baked into it. You want to import the file without the E.
The Cinematic controls appear in the Video inspector for clips in the project that have been shot in Cinematic Mode. You can control the depth of field, as with Portrait mode in stills, by adjusting the Depth of Field slider to change the F stop, which doesn’t actually change the exposure. Lowering the F stop will decrease the depth of field, increasing the blur in the image.
To control what actually is in focus you have to use the Cinematic Mode tool, which is a button in the Cinematic controls in the inspector, or also as a selection in the Transform tools in the lower left of the Viewer. When the tool is activated, on screen displays will show where the camera’s AI has set the focus point, as well as other points that are being tracked for focus. A yellow box indicates what’s in focus and a white box shows what was also being tracked by AI when the video was shot. If the camera AI changed the focus the boxes will change to display the shift. Hold Option key and drag with the mouse to show other potential focus points. To set a focus point in the Viewer double click the focus area to shift the focus to that spot.
To see where these focal changes occur right-click on the clip in the Timeline and choose Show Cinematic Editor, or the keyboard shortcut Control-Option-F. The Cinematic Editor will appear over the clip and show where the focus change points are. The white dots show where the camera AI made a decision to change the focal point. These cannot be moved or deleted as the AI generated focus points are embedded in the file. However, if you manually set a focus point while shooting by tapping on the screen, these can be moved or deleted as they’re user generated. If the focus is manually set on the phone at the start of the shot, the AI decisions are still there, but they’re not visible in the Cinematic Editor. If you delete the user created focus decision point, the white AI control points will appear in the Cinematic Editor. The Cinematic Editor will have a yellow line when it’s displaying manually created focus points, either created in phone or in FCP. Focus points can be added in the Cinematic Editor in FCP, which will override any AI or other existing focus pulls. You can go to the point where you want to focus to be set and double click a point on the screen to add a focus point to the Cinematic Editor. That will remain the focus point until changed. The focus points in the Cinematic Editor that are set in the Viewer behave like keyframes. To lock the focus point to a specific spot, play forward for however long you want it to be in focus. Double click on it again to add another focus point from where the focus will change to the next focus point. Like keyframes the farther apart the shifting focus points are the slower the rack focus will be. When you create a focus point in the Viewer a yellow dot is added to the Cinematic Editor. The dot can be moved by dragging it or deleted by clicking it and selecting Delete Focus Point from the menu that appears. Shift-Option-Command-right arrow will jump forward between focus points and Shift-Option-Command-left arrow will jump back between focus points.
The Depth of Field can also be animated with keyframes. To access the animation controls you can use the Video animation controls called up with Control-V. The Cinematic Depth of Field keyframes section lets you change the values and the timing. This feature is something that cannot be down in real world cinematography. The depth of field, the amount of blurring of the background of a closeup for instance, cannot be changed during the shot. This is unique to the iPhone.
There is a Cinematic option in the Browser search function under Format Info. This will let you create a Smart Collection for your Cinematic clips.
Compressor Watch Folders
A watch folder is a folder on your system that acts to automatically transcode any file placed in it to whatever setting has been assigned to the folder. To add the watch folder in Compressor, select Watch Folders at the top of the Batch window, and click Add Watch Folder button or the + button at the bottom to Add Watch Folder. You can also drag a folder from your system into the Watch Folders pane to automatically assign it as watch folder. Next, you have to assign a Setting to be used by the watch folder, and a Location, where the converted file should be saved. Click the Add button opposite Setting and Location.

A sheet drops down that lets to pick an Apple preset or a custom preset you created. The default location is Automatic, which creates a folder next to the watch folder with the same name plus - Output. One can of course assign a folder or a drive where you wanted the media saved. Any media that’s already in the folder will not be converted. The watch folder has to be activated first and then the media added. Click the checkbox next to the name of the folder to activate it. You can also use the popup in the Inspector to Activate or Deactivate the watch folder.
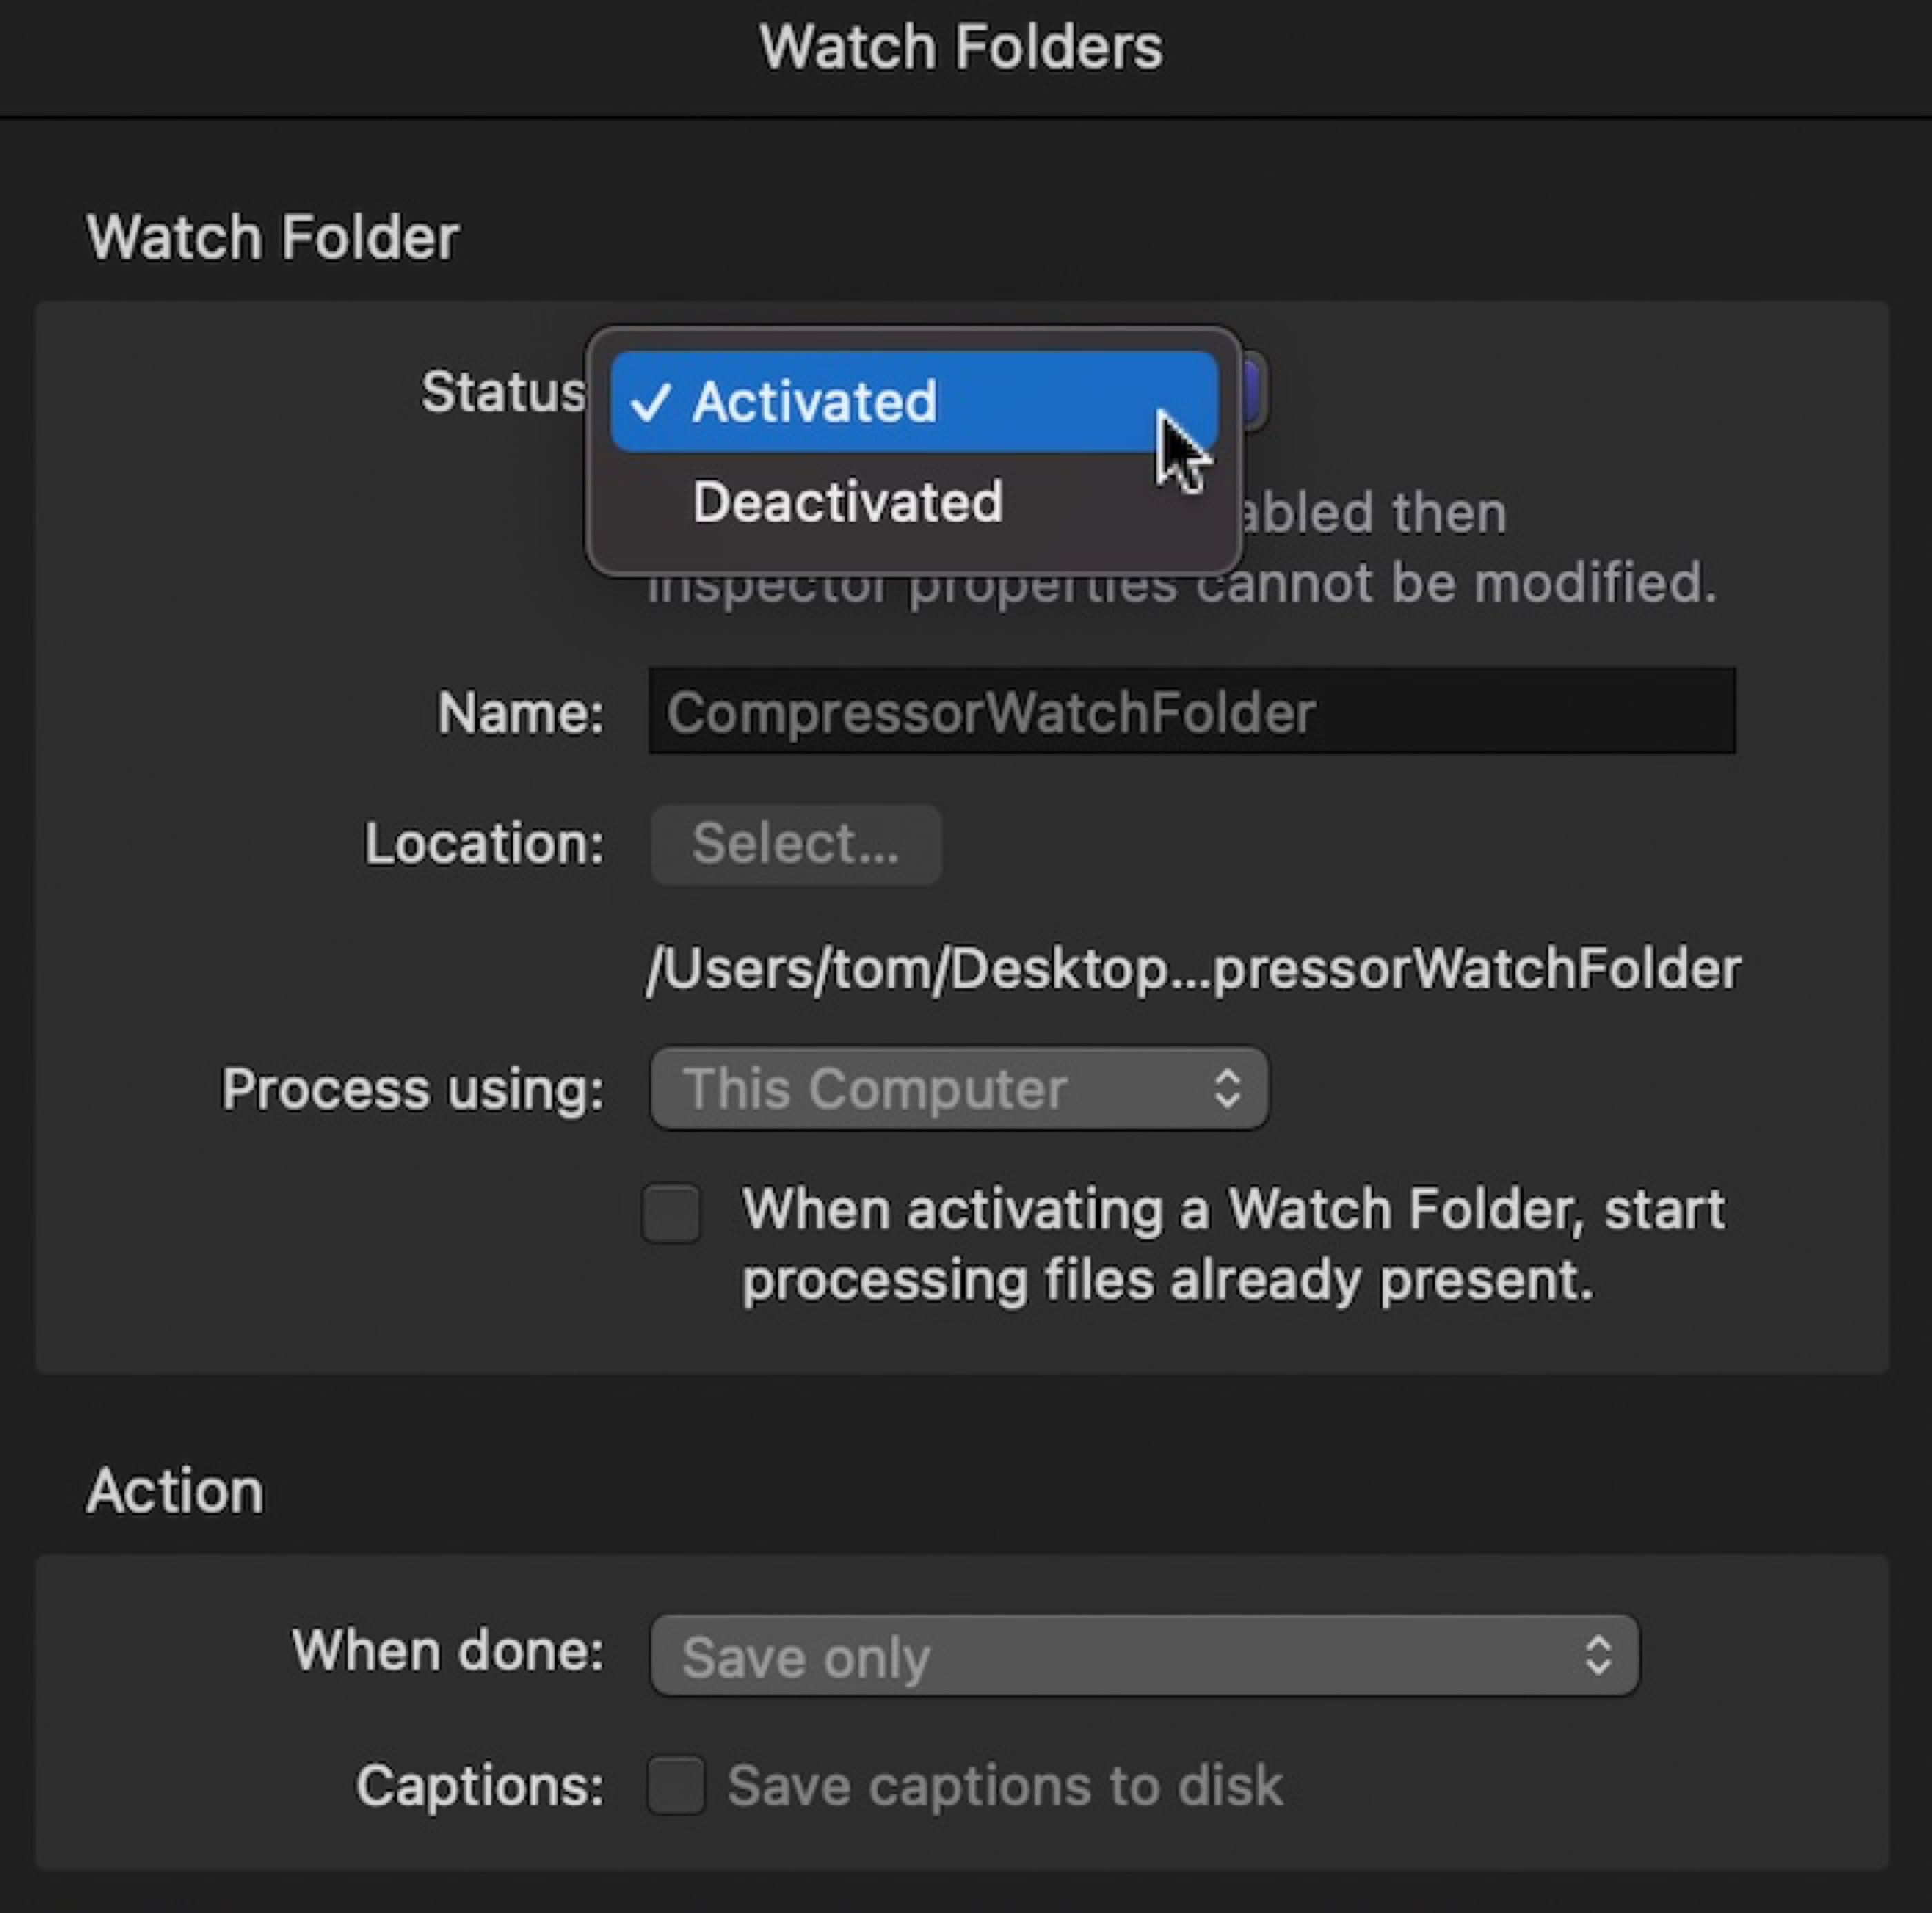
The watch folder has to be deactivated to make any changes to Settings or Location. Notice also at the bottom in the Inspector the When Done option, which allows choices like Add to TV, Create Blu-ray, Open with Application, or even Send Email.
You can add as many settings and location as you want to the watch folder, and of course create multiple watch folders that have different functions.
Finally, Compressor has to be open and the watch folder activated before you add a file to the watch folder. You cannot put a file in the folder and then launch Compressor; even with the watch folder activated it will not respond to the file that’s already there. There is, however, ß a checkbox in the Inspector that allows you to run conversions on clips that are already in the watch folder.
If you’re creating master files from FCP that need to have multiple file types created from it, watch folders are really useful. Simply export your master file in ProRes HQ for instance from FCP and set the destination as the watch folder. With Compressor open, as soon as the master file hits the watch folder Compressor will begin processing it.
For more on the feature update 10.6.2 click here.
